Getting started#
Video: Install modality XPLR#
System requirements#
Before installing modality XPLR, review the following system requirements to ensure compatibility and optimal performance.
Note
Internet access is required for installation and upgrading.
Note
HPC users with restricted internet access may need to speak to their system administrator and request that the biomodal PyPI
repository URL, passed to --extra-index-url during pip installation, is whitelisted
https://europe-python.pkg.dev/prj-biomodal-modality/modality-pypi/simple see Install modality XPLR on a system with restricted internet access
for instructions on offline installation.
Recommended operating systems#
modality XPLR is compatible with the following operating systems. We recommend using the latest version of each operating system for the best experience:
macOS
Linux (Ubuntu)
Note
Installation on Windows is supported via Windows Subsystem for Linux (WSL). Once WSL is installed, you can follow the Linux installation instructions for modality XPLR.
Recommended hardware requirements#
Processor: 4 CPU cores or equivalent 64-bit processor.
Memory (RAM): 16 GB.
Storage: At least 500 MB of available disk space for installation; additional space is required for local storage of Zarr store data to be analysed.
Python programming language#
The Python programming language is required to run modality XPLR. Currently, modality XPLR supports Python versions 3.10 and 3.11 and it is recommended to have the latest supported python version installed.
Non-python dependencies#
Essential
It is essential to have gzip installed on your system. The latest versions of macOS and Linux have these natively installed however, if you do not have these packages, they can be installed using brew install gzip for Mac and sudo apt-get install gzip for Linux (sudo may not be needed for some users).
gzip: For compression of genomic data.
Optional
The following non-python dependencies are optional but may provide performance enhancements. See installation section for further information.
Installation of WSL on Windows#
Installation of modality XPLR on Windows is supported via Windows Subsystem for Linux (WSL). Once WSL is installed, you can follow the Linux installation instructions for modality XPLR.
Start a PowerShell session by pressing the Start key, typing “PowerShell”, and clicking the PowerShell icon.
In the PowerShell window, run the following command to enable the WSL feature. Refer to Microsoft’s WSL guide for more details:
wsl --install
Note
WSL can only be installed if you have virtualisation enabled on the BIOS on your computer. The command wsl --install requires administrator privileges to be run. You may need to ask IT to run this command for you.
Launch WSL. You will be prompted to create a username and password. This user can run
sudocommands. If WSL is not launching, you may need to restart your computer first.
wsl
Once launched, change to the WSL home directory, rather than operating in the main Windows home directory:
cd $HOME
Install Python 3.11. modality XPLR is not compatible with Python 3.12 (which is the default in Ubuntu 24), so install python3.11. Alternatively, install an older version of Ubuntu.
sudo add-apt-repository ppa:deadsnakes/ppa
sudo apt update
sudo apt install python3.11 python3.11-venv
python3.11 --version
Install necessary dependencies. modality XPLR needs to build some packages to install, so install some build tools.
sudo apt install gcc g++ python3.11-dev
Create and activate a virtual environment for modality XPLR:
python3.11 -m venv modality_env
source modality_env/bin/activate
which python
Upgrade pip
pip install --upgrade pip
Proceed to the Perform a new install of modality XPLR step below, following the Linux instructions where applicable.
Important
By default, Windows allocates half the system memory to the WSL session - if your laptop has 16GB RAM, WSL gets 8GB by default. This can be altered by following Microsoft’s configuration guide.
Installation of modality XPLR#
Important
It is recommended that setup and installation are performed by your system administrator to meet all local policies. i.e., the person responsible for managing your organisation’s IT systems.
Install the latest version in a new virtual environment on macOS or Linux#
This section describes how to set up a new virtual environment and install modality XPLR.
Check your version of python#
Open the Terminal and type
pythonfollowed by the Tab key. This will list versions of python that are currently installed on your computer.If
python3.11is not listed, you can install it on:macOS: using homebrew (see https://brew.sh/). With homebrew installed, run
brew install python@3.11.Linux: using apt install,
apt install python3.11
Proceed once
python3.11is installed and listed according to Step 1 above.
Important
On Linux you may need to run apt get update before running the install command. In some cases, you may require sudo (admin) privileges
which would change the command to sudo apt get update and then sudo apt install python3.11. We recommend that you consult with your
system administrator before using sudo.
Note
modality XPLR does not currently support python versions >3.11.
Create a new virtual environment for modality XPLR#
The instructions below are for both macOS and Linux. Where platform-specific commands are needed (e.g., installing Python), they are provided side-by-side.
It is recommended to always install modality XPLR in a dedicated virtual environment, to specify the version of python to use, and to allow clean installation and uninstallation.
In this example we’ll create a new environment called modality_env
with python3.11, in a dedicated directory called biomodal-modality.
Run each line individually in your terminal.
mkdir biomodal-modality
cd biomodal-modality
python3.11 -m venv modality_env
When you want to install, use, or uninstall modality XPLR, first activate the virtual environment by specifying its name.
source modality_env/bin/activate
Note
This activation command is the same for macOS and Linux.
The terminal will then show the name of the virtual environment in parentheses, before the user/computer name, indicating that the virtual environment is active. To deactivate the virtual environment, enter:
deactivate
Perform a new install of modality XPLR#
These instructions describe how to install modality XPLR when there is no
version of modality XPLR currently installed. In this example, we will
install modality XPLR in the virtual environment called modality_env.
Important
When installing modality XPLR, it is reccommended to always provide a new, clean virtual environment. This can help to avoid version conflicts with modality dependencies that are not removed from the environment when running pip uninstall modality.
Activate your new virtual environment:
cd biomodal-modality
source modality_env/bin/activate
Install the latest version of modality XPLR using
pip:
pip install --extra-index-url https://europe-python.pkg.dev/prj-biomodal-modality/modality-pypi/simple modality
Note
To install a specific version of modality XPLR, specify it explicitly (e.g., modality==1.1.0).
To comply with modality XPLR’s licensing requirements, we must distribute the source of the following dependencies together with modality XPLR by downloading the
tarfiles.
VM_PYPATH=$(pip show modality | awk -F': ' '/^Location:/ {print $2}')
pip download -d $VM_PYPATH --no-deps --no-binary :all: crc32c==2.7.1
wget https://github.com/scikit-learn/scikit-learn/archive/refs/tags/1.2.0.tar.gz -O $VM_PYPATH/scikit-learn-1.2.0.tar.gz
wget https://github.com/scipy/scipy/archive/refs/tags/v1.11.4.tar.gz -O $VM_PYPATH/scipy-1.11.4.tar.gz
Check the currently installed version of modality XPLR at any time by running:
modality --version
Important
After a new install of modality XPLR, checking the version can take a few minutes to complete. Wait for the terminal to return the software version.
Install modality XPLR on a system with restricted internet access#
Note
Requires at least 1 machine with non-restricted internet access to download modality XPLR and it’s package dependency .whl files and remote transfer these to the target machine with restricted internet access.
If you encounter an error while attempting to install modality XPLR using pip as described in step 2 of Perform a new install of modality XPLR,
this may be due to restricted internet access on your system. In such cases, we recommend contacting your system administrator to whitelist
the biomodal PyPI repository URL https://europe-python.pkg.dev/prj-biomodal-modality/modality-pypi/simple
After the URL has been whitelisted, please try the installation again.
Alternatively, you can perform an offline installation by downloading the modality XPLR package .whl
files on a machine with internet access and transferring them to the target machine.
Follow the steps below for offline installation.
Create a new folder and download the modality package and its dependencies to this folder
mkdir modality_offline_download
pip download --extra-index-url https://europe-python.pkg.dev/prj-biomodal-modality/modality-pypi/simple modality==1.1.0 -d modality_offline_download
To comply with modality XPLR’s licensing requirements, we must distribute the source of the following dependencies together with modality XPLR by downloading the
tarfiles.
VM_PYPATH=$(pip show modality | awk -F': ' '/^Location:/ {print $2}')
pip download -d modality_offline_download --no-deps --no-binary :all: crc32c==2.7.1
wget https://github.com/scikit-learn/scikit-learn/archive/refs/tags/1.2.0.tar.gz -O modality_offline_download/scikit-learn-1.2.0.tar.gz
wget https://github.com/scipy/scipy/archive/refs/tags/v1.11.4.tar.gz -O modality_offline_download/scipy-1.11.4.tar.gz
Transfer the modality XPLR package and its dependencies to the target machine using
rsync
rsync -av --checksum modality_offline_download username@remote_host:/path/to/remote/destination/
Connect to the remote machine according to your organisation’s protocol
ssh username@remote_host
Change directory to where the modality XPLR package and its dependencies were transferred
cd /path/to/remote/destination/
6. Activate your virtual environment according to the steps followed in Create a new virtual environment for modality XPLR.
Note that this step expects that you are in the folder biomodal-modality created earlier when setting up the virtual environment.
source modality_env/bin/activate
Run the offline installation of modality XPLR in your activated virtual environment pointing to path of the downloaded files.
pip install --no-index --find-links=modality_offline_download modality
Optional: Install non-python dependencies, tabix and bgzip#
Refer back to Non-python dependencies for more information on these optional dependencies.
Note
The installation of non-python dependencies may bring performance gains and is managed with conda through the htslib library.
This section is not required to run modality XPLR but will provide you with additional performance
gains for particular workflows where bgzip (block compression) and tabix (quick index
look up) can be leveraged. Tabix indexes enable fast retrieval of specific genomic regions from
large genomic data files. To be indexable by Tabix, files must be both BGZF-compressed and sorted
by genomic coordinates. This allows tools to access regions of interest without loading the entire
file into memory - particularly useful for processing BED-format data efficiently.
Therefore, we recommend the installation of the htslib library using conda.
To check if conda is already installed, run the command below.
If conda is installed, proceed to installation of htslib.
conda --version
The following code describes how to install conda. Run each line individually.
On macOS:
mkdir -p ~/miniconda3
curl https://repo.anaconda.com/miniconda/Miniconda3-latest-MacOSX-arm64.sh -o ~/miniconda3/miniconda.sh
bash ~/miniconda3/miniconda.sh -b -u -p ~/miniconda3
rm ~/miniconda3/miniconda.sh
source ~/miniconda3/bin/activate
On Linux:
mkdir -p ~/miniconda3
curl https://repo.anaconda.com/miniconda/Miniconda3-latest-Linux-x86_64.sh -o ~/miniconda3/miniconda.sh
bash ~/miniconda3/miniconda.sh -b -u -p ~/miniconda3
rm ~/miniconda3/miniconda.sh
source ~/miniconda3/bin/activate
The following code describes how to install htslib with conda. Run each line individually.
conda init --all
conda activate base
conda install -c bioconda htslib
This will install the non-python dependencies in the base environment of conda. Therefore, you will need to activate the conda base environment as well as your modality XPLR environment before running modality XPLR commands.
Upgrade the existing version of modality XPLR#
When a new version of modality XPLR is available, you can upgrade the
software by adding --upgrade to the end of the install prompt. Ensure
that your modality XPLR environment is activated when installing, upgrading,
or uninstalling modality XPLR.
If you encounter any issues during the upgrade process, try installing modality XPLR in a new virtual environment.
pip install --extra-index-url https://europe-python.pkg.dev/prj-biomodal-modality/modality-pypi/simple modality --upgrade
Check the currently installed version of modality XPLR at any time by running:
modality --version
Uninstall modality XPLR#
To uninstall a version of modality XPLR, run the following command. Checking the version afterwards will confirm that modality XPLR has been uninstalled, if it cannot be found in the virtual environment:
pip uninstall modality
Authenticate modality XPLR#
Upon first use of running any modality command, you will be prompted to authenticate your installation with an e-mail address and password.
Authentication is only required once per machine.
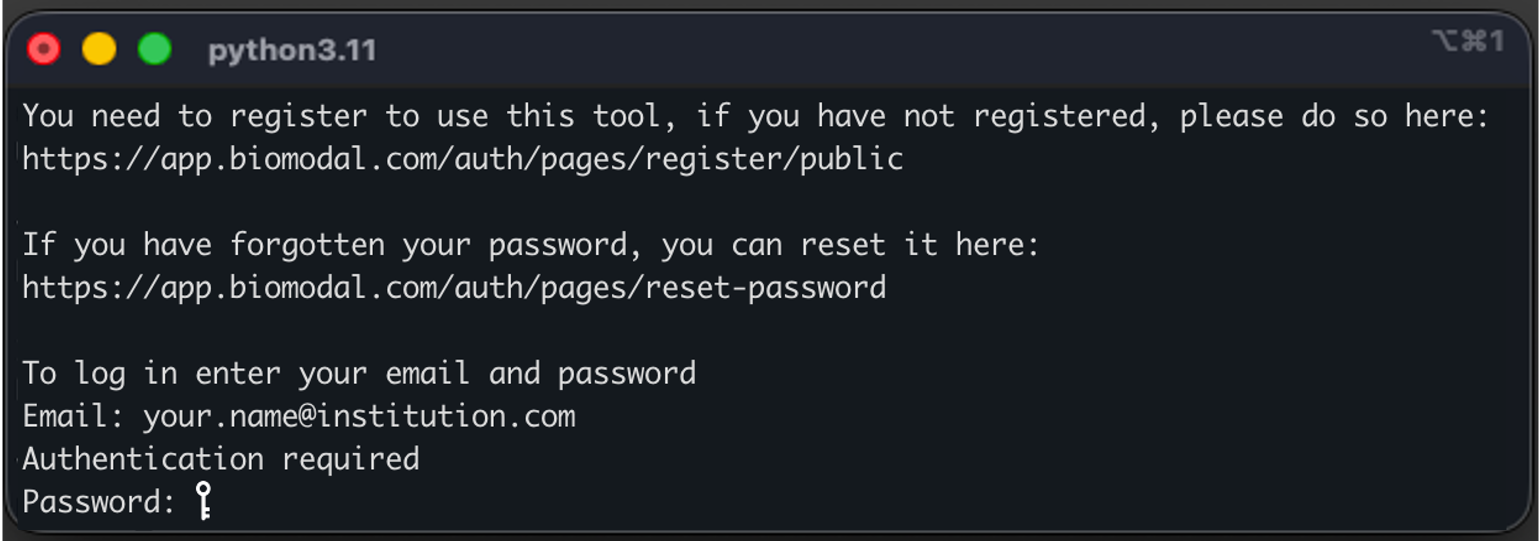
Figure 2 modality XPLR authentication prompt.#
If you or your institution is already a user of biomodal duet Software for pipeline processing, login to modality XPLR using your existing biomodal credentials.
If you are not already a biomodal user, you can self-register for access to modality XPLR. Please use your institution e-mail address when registering.
If you have forgotten your password, you can reset it.
Note
Self-registered users will have access to modality XPLR only. For access to duet Software, please contact your biomodal Sales or Support representative.